Master Your Week with Freezer-Friendly Moroccan Chickpea Couscous Meal Prep
In today's fast-paced world, finding time for healthy, delicious, and homemade meals can feel like an impossible task. But what if we told you there’s a vibrant, nutrient-packed dish that not only satisfies your taste buds but also serves as the ultimate meal prep champion? Enter the freezer-friendly Easy Anti-Inflammatory Moroccan Chickpea Couscous – a culinary marvel that brings the exotic flavors of North Africa right to your plate, ready when you are. This isn't just another vegetarian dish; it's a strategic move towards a healthier, more convenient lifestyle, bursting with anti-inflammatory ingredients and an irresistible aroma that will have you eagerly anticipating your next meal.Why Moroccan Chickpea Couscous is Your Next Meal Prep Obsession
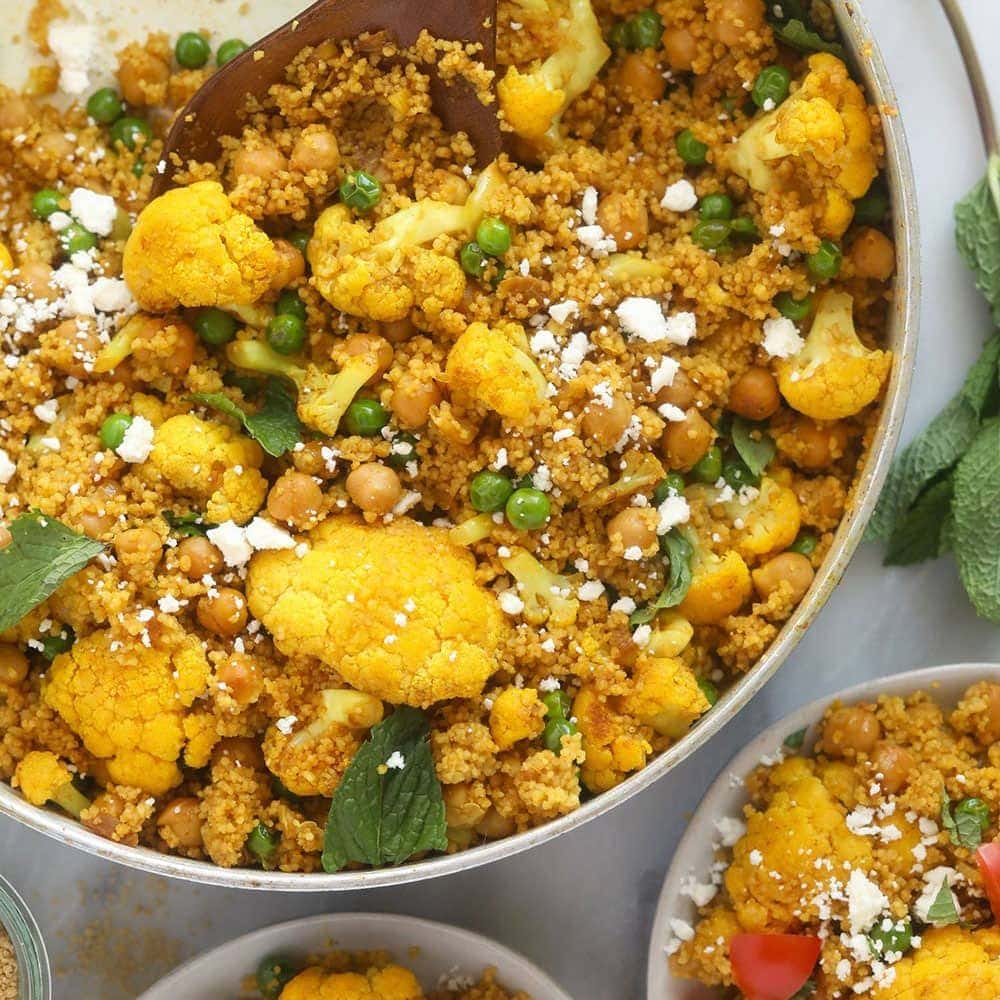
This gorgeous skillet meal is more than just a feast for the eyes; it's a powerhouse of nutrition designed for modern living. Imagine a dish so flavorful it feels gourmet, yet so simple to prepare and even simpler to store. The magic of this particular Moroccan chickpea couscous lies in its incredible blend of health benefits and convenience.Packed with wholesome, anti-inflammatory superstars, each spoonful contributes to your well-being. Key ingredients include:
- Cauliflower: A versatile cruciferous vegetable rich in antioxidants and vitamins.
- Turmeric: The golden spice, renowned for its potent anti-inflammatory properties.
- Garlic: A staple in healthy cooking, offering both flavor and immune-boosting benefits.
- Couscous: A quick-cooking grain that forms the perfect fluffy base.
- Garbanzo Beans (Chickpeas): An excellent source of plant-based protein and fiber, keeping you full and satisfied.
- Vegetable Broth: Infusing every ingredient with depth and moisture.
This harmonious combination creates a robust, flavorful, and incredibly satisfying vegetarian meal. It’s the kind of dish that delights your senses while nourishing your body, proving that healthy eating doesn't have to be bland or time-consuming. And the best part? Its exceptional freezer-friendliness makes it an absolute dream for anyone dedicated to efficient meal prepping.
The Secret to Authentic Flavor: Your Homemade Moroccan Spice Blend
The heart and soul of any truly authentic Moroccan chickpea couscous lies in its spice blend. While store-bought options exist, crafting your own ensures freshness, potency, and the ability to customize to your exact taste preferences. Don't be intimidated by the idea of a homemade blend; it's surprisingly simple, and you likely already have most of the necessary spices in your pantry.Our essential Moroccan spice blend typically calls for:
- Cumin: Earthy and warm, a cornerstone of Moroccan cuisine.
- Turmeric: Providing vibrant color and its signature earthy, slightly bitter notes, alongside its health benefits.
- Ginger Powder: Adding a warm, spicy kick.
- Garlic Powder: For concentrated garlic flavor without the moisture of fresh garlic.
- Chili Powder: A mild warmth that complements other spices.
- Cayenne Pepper: For those who enjoy a little extra heat – adjust to your preference.
- Salt: To enhance and balance all the flavors.
Whipping up a batch of this blend is quick; approximately three tablespoons of fragrant spice will be at your fingertips. Our featured Moroccan chickpea couscous recipe typically uses two tablespoons, leaving you with a little extra. This surplus is a meal prep bonus, perfect for seasoning roasted vegetables, grilled proteins, or even other Moroccan-inspired dishes. The depth and complexity this homemade blend brings are unparalleled, transforming simple ingredients into an extraordinary culinary experience.
Crafting Your Freezer-Friendly Moroccan Chickpea Couscous Skillet
Despite its sophisticated flavor profile, preparing this vegetarian skillet is remarkably straightforward. It’s designed to be forgiving and efficient, even with a seemingly longer list of nutrient-dense vegetables. Let’s break down the simple steps to create this freezer-friendly delight.Sautéing Your Flavor Base
Begin by heating a generous glug of olive oil over medium-high heat in a large, deep nonstick skillet. The size matters here; a 16-inch skillet is ideal to comfortably hold all the ingredients, but any large, deep pan will do. Once the olive oil is fragrant, introduce the diced onion and minced garlic. Sauté them for a couple of minutes until they soften and release their aromatic magic – this is the foundation of your flavor. Next, add the heartier vegetables: cauliflower florets, tender peas, and the star of the show, garbanzo beans (chickpeas). Sprinkle in your freshly prepared Moroccan seasoning and continue to sauté for another 5-7 minutes, stirring consistently to ensure everything is evenly coated and the vegetables begin to tenderize and absorb the spices. Maintain medium-high heat throughout this initial stage to build rich, caramelized flavors.
Incorporating Couscous and Broth
With your veggies beautifully spiced and slightly softened, it's time to add the couscous directly into the skillet. Mix it thoroughly with the vegetables, ensuring every grain gets a whisper of the aromatic spices. This light toasting of the couscous can add another layer of depth. Immediately after, pour in the vegetable broth, making sure it’s enough to cover the couscous and vegetables. Bring the mixture to a brisk boil.
The "Cook and Rest" Method for Perfection
Once your skillet reaches a rolling boil, the magic happens. Immediately remove the entire skillet from the heat, cover it tightly with a lid, and let it sit undisturbed for precisely 5 minutes. This crucial resting period allows the couscous to steam perfectly, absorbing all the flavorful broth and plumping up into tender, fluffy grains. It also ensures that the vegetables continue to steam gently, reaching that ideal tender-crisp texture without becoming mushy.
Uncover and Fluff for Even Distribution
After the resting period, gently uncover your skillet. You’ll be greeted by a vibrant, aromatic masterpiece. Use a fork to fluff the couscous, gently separating the grains and incorporating all the ingredients. This step not only improves the texture but also ensures every spoonful is a delightful mix of chickpeas, cauliflower, peas, and the irresistible Moroccan spices.
Elevating Your Experience: Optional Toppings and Smart Meal Prep Tips
While the base Moroccan chickpea couscous is undeniably delicious on its own, a few optional toppings can elevate your meal to an extraordinary culinary experience. The key is to add these fresh components right before serving, especially when meal prepping.- Crumbled Feta: Adds a delightful tangy, salty counterpoint that beautifully complements the warm Moroccan spices. For a dairy-free option, any crumbled vegan cheese works wonderfully.
- Fresh Mint: A game-changer! Chopped fresh mint provides a bright, refreshing burst that cuts through the richness of the spices, a traditional and essential accompaniment in Moroccan cuisine.
- Golden Raisins or Dried Apricots: For a touch of natural sweetness that pairs exquisitely with savory spices, adding another layer of complexity.
- Toasted Almonds or Pistachios: Offers a satisfying crunch and nutty flavor.
- A squeeze of Fresh Orange or Lemon Zest: Brightens the entire dish with a citrusy perfume.
- A dollop of Plain Greek Yogurt (or dairy-free alternative): Adds a creamy, cooling element.
Meal Prep Pro Tip: If you're preparing this for future meals, store the main couscous dish in individual airtight containers. Keep any fresh toppings like mint, feta, or nuts in separate small compartments or bags, adding them just before you heat and enjoy your meal. This ensures the best texture and freshest flavor.
The Ultimate Freezer-Friendly Meal Prep Strategy
This Moroccan chickpea couscous truly shines as a meal prep hero because of its exceptional freezer-friendliness.Freezing Instructions:
- Cool Completely: Before freezing, allow the cooked chickpea couscous to cool entirely to room temperature. This prevents condensation and ice crystal formation, which can affect texture.
- Portioning: Divide the couscous into individual, airtight freezer-safe containers. Glass containers with locking lids or sturdy plastic containers work best. Ensure there’s minimal air space to prevent freezer burn.
- Label and Date: Always label your containers with the dish name and date. This meal will stay fresh and delicious in the freezer for up to 3 months.
Reheating Instructions:
Reheating is just as simple, making those busy weeknights a breeze:
- Microwave: Transfer a frozen portion to a microwave-safe dish. Heat on high, stirring occasionally, until thoroughly heated through. You might want to add a tablespoon or two of water or broth to restore moisture.
- Stovetop: For best results, especially with larger batches, transfer frozen couscous to a skillet with a splash of water or broth. Cover and heat over medium-low heat, stirring occasionally, until thawed and hot.
- Oven: Preheat oven to 350°F (175°C). Place frozen couscous in an oven-safe dish, cover with foil, and heat for 20-30 minutes, or until warmed through.
Once reheated, fluff with a fork and add your desired fresh toppings. You'll have a wholesome, flavorful meal ready in minutes, tasting just as vibrant as the day it was made.
